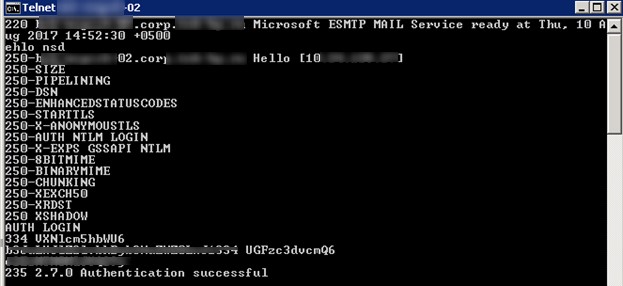
проверка SMTP сервера через Telnet

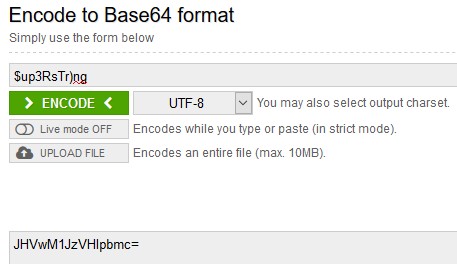
Для авторизации на почтовом сервер с с помощью AUTH LOGIN, нам нужно преобразовать имя и пароль пользователя, из-под которого будет отправляться письмо в формат Base64. Это можно сделать с помощью скриптов или онлайн сервисов. Я воспользоваться сайтом https://www.base64encode.org/ или https://calcus.ru/base64.

Имя пользователя:  testuser@contoso.com, в кодировке  Base64 получилось: dGVzdHVzZXJAY29udG9zby5jb20=

Пароль: $up3RsTr)ng — в Base64 JHVwM1JzVHIpbmc=

конвертация имени и пароля в формат base64

Теперь в командой строке с помощью Telnet подключаемся на 25(SMTP) порт нашего почтового сервера (вводимые команды я буду выделять синим цветов):

telnet mail.contoso.com 25

Если это Exchange, он вернет что-то вроде;

220 mail.contoso.com Microsoft ESMTP MAIL Service ready at Thu, 10 Aug 2015 14:25:30 +0300

Представимся:

ehlo sender.contoso.com

Сервер вернет список поддерживаемых типов авторизаций и возможностей. Как вы видите базовая авторизация (AUTH LOGIN) в списке имеется.

250-mail.contoso.com Hello [192.168.100.15]
250-SIZE 36700160
250-PIPELINING
250-DSN
250-ENHANCEDSTATUSCODES
250-STARTTLS
250-AUTH LOGIN
250-8BITMIME
250-BINARYMIME
250 CHUNKING

Сообщаем SMTP серверу, что мы хотим авторизоваться с помощью имеющейся учетной записи:

AUTH LOGIN

Сервер должен ответить:
334 VXNlcm5hbWU6

Теперь вставляем имя пользователя в формате Base64, которое мы закодировали ранее:
dGVzdHVzZXJAY29udG9zby5jb20=

Сервер должен ответить:

334 UGFzc3dvcmQ6.

Теперь пора вставить пароль в формате Base64:
JHVwM1JzVHIpbmc=

Если имя и пароль пользователя верны, сервер ответит.
235 2.7.0 Authentication successful

Если нет:

535 5.7.8 Error: authentication failed: UGFzc3dvcmQ6

отправка письма из telnet с smtp аутентификацией - 235 2.7.0 Authentication successful

Теперь можно заполнить стандартные поля письма:

mail from: testuser@contoso.com
250 2.1.0 Sender OK
rcpt to: admin@contoso.com
250 2.1.5 Recipient OK
data
354 Start mail input; end with .
from: TestUserovich <testuser@contoso.com>
to: TheAdmin < admin@contoso.com >
Subject: Test BASE SMTP Authenticated via Telnet
This is test
.
250 2.6.0 <ae80548d-cb8a-4c79-ad80-55b1190df753@mail.contoso.com> [InternalId=6384384] Queued mail for delivery

отправка письма из командной строки с выполнением ауторизации на сервере smtp

QUIT

221 2.0.0 Closing connection.
Connection closed by foreign host.


Запрет изменения личной информации в Exchange OWA 2010

Exchange 2010 Role Based Access Control (Part 4)

by [Published on 27 July 2010 / Last Updated on 27 July 2010]

A look at the new Role Based Access Control model in Exchange 2010.

If you would like to read the other parts in this article series please go to:

Introduction

In this article series you have seen how users can be added to management role groups to grant them permissions to run the cmdlets that are linked to the management role groups. This method is typically used to grant administrators and specialist users the permissions that they need to perform their duties. For normal users who are not administrators or specialist users, management role assignment policies can be used. These management role assignment policies are typically used to grant users permissions to manage their own mailboxes as we shall see within this part of the overall RBAC article series.

Management Role Assignment Policies

All mailboxes are assigned a default role assignment policy unless a specific role assignment policy is otherwise specified. The default role assignment policy is named, rather unsurprisingly, Default Role Assignment Policy and its link to a mailbox can be seen by examining the output of any mailbox and looking for the RoleAssignmentPolicy attribute. For example, to examine the configuration of the mailbox belonging to the user Neil and filter the output for the RoleAssignmentPolicy attribute, the following cmdlet can be used:

Get-Mailbox Neil | fl RoleAssigmentPolicy

The result of running this cmdlet can be seen in Figure 14.


Figure 14: Default Role Assignment Policy

We will shortly examine the contents of the Default Role Assignment Policy to see what it contains and which permissions are granted. However, although we won’t be covering the creation of custom role assignment policies within this particular article series, it is worth covering at this point how you can change the management role assignment policy that is linked to a mailbox. For an existing mailbox, you can use the Set-Mailbox cmdlet with theRoleAssigmentPolicy parameter to change the management role assignment policy. For example, to set Neil’s mailbox to use a management role assignment policy called New Policy the following cmdlet could be used:

Set-Mailbox Neil –RoleAssignmentPolicy ‘New Policy’

For new mailboxes, the RoleAssignmentPolicy parameter of the New-Mailbox cmdlet can be used to specify the name of the management role assignment policy to be used when that mailbox is first created. If no specific policy name is applied when creating a new mailbox, the default management role assignment policy will be applied.

Management Role Assignments

If you have been reading the previous parts of this article series, you will remember that management role assignmentsare links between management role groups and management roles. In the context of management role assignment policies, management role assignments are also used and function as the link between management roles and management role assignment policies. You will also remember that management roles essentially hold a group of cmdlets that the user is allowed to run.

Let’s take a closer look at the Default Role Assignment Policy and see which management role assignments are linked to it. Ordinarily, you might be tempted to bring up the properties of the Default Role Assignment Policy via a cmdlet such as:

Get-RoleAssignmentPolicy –Identity ‘Default Role Assignment Policy’

The result of running this cmdlet can be seen in Figure 15.


Figure 15: Properties of the Default Role Assignment Policy

As you can see from Figure 15, the output does present some useful information such as the description of the policy but it doesn’t really tell you anything meaningful such as the management role assignments linked to the policy. To get this information, we can use the Get-ManagementRoleAssigment cmdlet together with the RoleAssignee parameter. By specifying the RoleAssignee as the Default Role Assignment Policy, we can see all management role assignments that are linked with the default policy. Ordinarily, a lot of information is returned when executing this cmdlet so in the example cmdlet below we can filter the output to only present the name and role information:

Get-ManagementRoleAssignment –RoleAssignee ‘Default Role Assignment Policy’ | fl Name,Role

You can see the result of running this cmdlet in Figure 16:


Figure 16: Assigned Management Roles

Management Roles

The output of Figure 16 shows you that the management role assignment policy called Default Role Assignment Policy is linked with five management roles called MyBaseOptions, MyContactInformation, MyVoiceMail, MyTextMessagingand MyDistributionGroupMembership.

Each of these management role names should be reasonably self-explanatory in what the roles are designed to allow the user to do but the table below serves to emphasize this information as it contains the five management role names together with their default descriptions.

Management Role Description
MyBaseOptions This role enables individual users to view and modify the basic configuration of their own mailbox and associated settings.
MyContactInformation This role enables individual users to modify their contact information, including address and phone numbers.
MyVoiceMail This role enables individual users to modify their voice mail settings.
MyTextMessaging This role enables individual users to create, view, and modify their text messaging settings.
MyDistributionGroupMembership This role enables individual users to view and modify their membership in distribution groups in an organization, provided that those distribution groups allow manipulation of group membership.

Table 1: Assigned Management Role DescriptionsIn order to keep this article reasonably short, let us now focus on looking deeper at just one of the management roles listed in Table 1, namely the MyContactInformation management role. In Figure 11 in part three of this article series we saw the generic Exchange Control Panel page within Outlook Web App.  In the centre of this screen it is possible to click the Edit button to allow the editing of the user’s own contact information as you can see from Figure 17.


Figure 17: Editing Contact Information

The ability for the users to edit their own contact information is made possible by the fact that the MyContactInformation management role is assigned to the users. Let’s take a deeper look at how the MyContactInformation management role is constructed. First of all, let’s take a closer look at the actual management role assignment calledMyContactInformation-Default Role Assignment Policy that you can see listed in Figure 16. To do this, we can run the following cmdlet:

Get-ManagementRoleAssignment ‘MyContactInformation-Default Role Assignment Policy’ | fl

You can see the result of running this cmdlet in Figure 18.


Figure 18: Management Role Assignment Details

You may remember from earlier in this article series that the Mailbox Search-Discovery Management role assignment had RecipientReadScope and RecipientWriteScope values of Organization, meaning that the scope of this management role assignment is set across the entire Exchange organization. Compare that information to the RecipientReadScope and RecipientWriteScope values seen in Figure 18 above, where you will see that the scopes for the MyContactInformation-Default Role Assignment Policy management role assignment are set to Self, meaning that the assigned roles can only modify the local mailbox information rather than the entire Exchange organization. This makes sense, as you may remember right back in part one of this article series that we said management role groups are used for overall administrators or specialist users, whereas management role assignment policies are used for the users themselves; clearly an individual user only requires permissions to modify his or her own information.

As for the actual cmdlets that the user will be able to run, we can examine this information by using the Get-ManagementRole cmdlet to examine the properties of the MyContactInformation management role and filter the output to show only the RoleEntries parameter. A suitable cmdlet is:

Get-ManagementRole MyContactInformation | fl RoleEntries

You can see the result of running this cmdlet in Figure 19.


Figure 19: The MyContactInformation Management Role

You can see from Figure 19 that this management role grants the user the rights to run the Set-User cmdlet with many different parameters such as the City, MobilePhone, Office and PostalCode parameters. It also grants the user the right to run the Get-Mailbox cmdlet with the Identity parameter. You may also remember from part three of this article series that it is easier to use the Get-ManagementRoleEntry cmdlet to display this information. For example, the following cmdlet could be used:

Get-ManagementRoleEntry MyContactInformation\* | ft –AutoSize -Wrap

The result of running this cmdlet is shown in Figure 20 where you can see that the cmdlet and parameter information is displayed much more clearly.


Figure 20: Get-ManagementRoleEntry Results

To demonstrate that the MyContactInformation management role in conjunction with the management role assignment does indeed allow a user to edit their own contact information, let’s prove this by removing the management role assignment. You probably will not want to do this in your production environment but this exercise can be useful to understand how all the various RBAC components work together. Consider Figure 21 where you can see that we first confirm that the Default Role Assignment Policy contains the management role assignment called MyContactInformation-Default Role Assignment Policy.

Next, the management role assignment policy can be removed via this cmdlet:

Remove-ManagementRoleAssignment ‘MyContactInformation-Default Role Assignment Policy’

The Get-ManagementRoleAssignment cmdlet is then re-run to confirm that the management role assignment is no longer available.


Figure 21: Removing the Management Role Assignment

The result of making this change is that, the next time the user logs onto OWA and attempts to edit their own contact information, it is not possible to edit the various fields as you can see from Figure 22.


Figure 22: Unable to Edit Contact Information

Summary

That concludes this four-part article series on an introduction to the RBAC model within Exchange 2010. In this article series you have seen how management role groups and management role assignment policies are used to assign permissions within Exchange 2010. I’ve taken the time to look at a specific management role group and a specific management role assignment policy, and broken these down into the various components in order to understand how they are used to assign permissions. This will allow future articles on customized solutions to be better understood.

If you would like to read the other parts in this article series please go to:


Запрет отправки писем с внешнего IP от имени своего домена.

Prevent Spam Mail From Your Own Domain in Exchange 2007

One of the biggest bug-bears with spam is the spam that comes from (or supposedly comes from) random_username@yourdomain.com or even your_username@yourdomain.com. This is known as spoofed mail and is a common technique that spammers use to try to get mail past Anti-Spam software.

From the Anti-Spam logs on my own server in the last 24-hours, I have received 1,974 emails (out of 17,432 in total) where the sender domain matched the recipient domain. This is about 11.3% of all mail that hit my server, so it is a relatively large problem. Factor that up to a year’s worth of mail and you get 720,510 a year.

To prevent this from happening, you simply need to remove a specific permission that allows anonymous senders to use your internal domain names in the Mail From section of an email. If anyone tries to do this (anonymous users only) they will receive a “550 5.7.1 Client does not have permissions to send as this sender” message.

The syntax to remove the permission should be entered as follows in the Exchange Management Console:

Get-ReceiveConnector “My Internet Receive Connector” | Get-ADPermission -user “NT AUTHORITY\Anonymous Logon” | where {$_.ExtendedRights -like “ms-exch-smtp-accept-authoritative-domain-sender”} | Remove-ADPermission

(You need to change the “My Internet Receive Connector” part in the above syntax)

Having run this command successfully, test using Telnet to your mail server from an external computer and see what happens if you try to send mail as one of your internal domain names. You should receive the 550 5.7.1 Message.

N.B. To put the permission back (in case you need to), please run the following:
Get-ReceiveConnector “My Internet Receive Connector” | Get-ADPermission -user “NT AUTHORITY\Anonymous Logon” | where {$_.ExtendedRights -like “ms-exch-smtp-accept-authoritative-domain-sender”} | Add-ADPermission

If you have internal photocopiers and other hardware that needs to relay via your Exchange 2007 server and you cannot configure them with a username / password, then removing the above permissions will prevent you from relaying and will cause you problems.


change your expired passwords in OWA

http://blogs.technet.com/b/exchange/archive/2010/10/06/so-you-want-to-change-your-expired-passwords-in-owa.aspx


pdate 10/21/11: Exchange 2010 Service Pack 1 Update Rollup 3 and later supports using a UPN in the change password dialog. Also, please see our TechNet documentation on the subject, here.

A while back, I posted What you need to know about the OWA Change Password feature of Exchange Server 2007, which higlighted a significant pain point — the loss of the IISADMPWD virtual directory as a supported feature in Windows Server 2008/IIS 7.0. This prevented web client users with expired passwords from being able to change their password and log on. This was a problem for many OWA users — especially remote/mobile users with non-domain-joined computers.

Good news! Exchange Server 2010 Service Pack 1 and Exchange Server 2007 Service Pack 3 (running on Windows Server 2008 or Windows Server 2008 R2) have a new feature that will allow users with expired passwords to change their password. This also works for users who have their accounts configured to change password on next logon (User must change password at next logon in ADUC).

Use this procedure to enable it on Exchange 2007 SP3 and Exchange 2010 SP1 Client Access servers:

Note: If you are using a CAS Array, you must perform these steps on each CAS in the array.

  1. On the Client Access Server (CAS), click Start > Run and type regedit.exe and click OK.
  2. Navigate to HKLM\SYSTEM\CurrentControlSet\Services\MSExchange OWA.
  3. Right click the MSExchange OWA key and click New > DWord (32-bit).
  4. The DWORD value name is ChangeExpiredPasswordEnabled and set the value to 1.
    Note: The values accepted are 1 (or any non-zero value) for «Enabled» or 0 or blank / not present for «Disabled»
  5. After you configure this DWORD value, you must reset IIS. The recommended method to reset IIS is to use IISReset /noforce from a command prompt.

Important: When changing passwords, users can’t use a UPN (for example, johndoe@contoso.com) in the Domain\user name field in the Change Password window shown below, unless E2010 SP1 RU3 or later has been deployed on the Client Access servers.


Чиним арбитрейшен ящики

http://www.careexchange.in/how-to-recreate-system-mailbox-federatedemail-discoverysearchmailbox-in-exchange-2010/

How to recreate System Mailbox , FederatedEmail & DiscoverySearchMailbox in Exchange 2010

When we recreate — System Mailbox , FederatedEmail & DiscoverySearchMailbox in Exchange 2010 ?

  • DC crashes
  • If the Default Database is Deleted these maiboxes will go Orphaned
  • System mailboxes go Corrupted

You Could See these  (System Mailbox , FederatedEmail & DiscoverySearchMailbox) in Active Directory Users Container  by Default

System mailboxes are created by Exchange in the root domain of the Active Directory forest during installation. Users or administrators can’t log on to these mailboxes. System mailboxes are created for Exchange 2010 features such as message approval and Multi-Mailbox Search. This table lists information about system mailboxes as they’re displayed in Active Directory.


How to Verify these mailboxes are available and its active or not

Running in Exhcange Management Shell

Get-mailbox -arbitration

Should Show up SystemMailbox and FederatedEmail

If your not Seeing this , It means they are not enabled

Now Let us learn how to recreate them and Enable them

For Example I would Delete this Mailboxes from Users Container – in Active Directory Users and Computers

Now We need the Setup CD inorder to recreate them  “Same Version of Setup ”

Open Command Prompt

Browsed into the Setup location , Run

Setup.com /prepareAd

This would Create System Mailboxes , FederatedEmail & DiscoverySearchMailbox

Running

Setup.com /Preparead

It should create them .But Until you Enable them, They won’t work

Now we got to Collect the SystemMailboxe and FederatedEmail and DiscoverySearchMailbox Exact GUID names inorder to Enable them

Now I have the values my my Environment

For Example –

System Mailbox GUID values

SystemMailbox{1f05a927-6a9b-4101-abd2-70838d0c8e86}
SystemMailbox{e0dc1c29-89c3-4034-b678-e6c29d823ed9}

FederatedEmail GUID values

FederatedEmail.4c1f4d8b-8179-4148-93bf-00a95fa1e042

DiscoverySearchMailbox GUID values
DiscoverySearchMailbox {D919BA05-46A6-415f-80AD-7E09334BB852}

Now We Got to Enable them –  (Real time you got to use your own GUID value)

Enabling System Mailboxes

Enable-Mailbox –Arbitration "SystemMailbox{Guid Value1}"
Enable-Mailbox –Arbitration "SystemMailbox{Guid Value2}"
Enable-Mailbox –Arbitration "FederatedEmail.Guid Value"
Enable-Mailbox - Discovery "DiscoverySearchMailbox {Guid Value}"

For Example I ran-

Enable-Mailbox –Arbitration "SystemMailbox{1f05a927-6a9b-4101-abd2-70838d0c8e86}"
Enable-Mailbox –Arbitration "SystemMailbox{e0dc1c29-89c3-4034-b678-e6c29d823ed9}"
Enable-Mailbox –Arbitration "FederatedEmail.4c1f4d8b-8179-4148-93bf-00a95fa1e042"
Enable-Mailbox - Discovery "DiscoverySearchMailbox {D919BA05-46A6-415f-80AD-7E09334BB852}"

Now to Verify If you Did the Right thing

Running this – It should show up your System Mailboxes , FederatedEmail

Great !!

You learnt how to recreate System Mailbox , FederatedEmail & DiscoverySearchMailbox in Exchange 2010 Server


тестирование EXCHANGE


Инструменты для тестирования Exchange

jetstress http://www.microsoft.com/en-us/download/details.aspx?id=36849

loadgeneretor https://technet.microsoft.com/en-us/library/bb508893(v=exchg.80).aspx

logparser studio


Восстановление учетной записи.

после восстановления учетной записи из корзины не работает почта.
проблема в том что Exchgange не успевает отрабатывать все манипуляции.
запускаем на сервере Exchange
Get-MailboxDatabase | Clean-MailboxDatabase


Как посмотреть список отправленных сообщений сразу на нескольких Hub transport серверах?

Если в вашей почтовой организации несколько серверов с ролью Hub transport, то информация о прохождении писем будет храниться на нескольких серверах и команда Get-MessageTrackingLog будет отображать информацию только с текущего сервера. Можно конечно указать параметр -Server, но существует более удобный способ получения единого трекинга сообщений.

Для этого необходимо выполнить следующий командлет:

"Server1.exchangerus.ru","Server2.exchangerus.ru","Server3.exchangerus.ru" |
get-transportserver | Get-MessageTrackingLog  -Recipients pavel@gmail.com -Start "29/04/2011" -End "15/05/2011"|
 sort -property timestamp  | ft timestamp,source, eventid, serverhostname, messagesubject

В вышеприведенном примере мы запрашиваем список сообщений, отправленных на адрес pavel@gmail.com за определенный период

  1. «Server1.exchangerus.ru»,»Server2.exchangerus.ru»,»Server3.exchangerus.ru»  — это перечисление списка серверов, передаваемый на вход командлету get-transportserver . Вы можете добавить хоть все свои серверы в этот список.
  2. Get-transportserver получает объекты для каждой  строки из списка и сервер выполняет на каждом сервере Get-MessageTrackingLog
  3. Полученные результаты сортируются по дате получения и отображаются единым списком с полями


EmailHeaders

http://mxtoolbox.com/Public/Tools/EmailHeaders.aspx?huid=7f6b8ccb-a253-4c27-8f96-3b3c9a212803


Управление правилами почтового ящика в Exchange Server 2010

Командлет, используемый для получения списка называется Get-InboxRule:

Get-InboxRule –Mailbox <MailboxUser>

Если вы хотите увидеть какое то определенное правило, используйте команду

Get-InboxRule –Mailbox <MailboxUser> -Identity “<Rule-Name>”

Для более удобного просмотра правил, используйте следующую конструкцию:

Get-InboxRule –Mailbox <MailboxUser> | Select Name, Description | fl

Теперь посмотрим на правило более детально с помощью командлета:

Get-InboxRule –Mailbox Anderson -Identity “Subject contains ‘Payroll’”

Теперь мы знаем нужные нам атрибуты, от нашего руководителя знаем какие значения необходимо им присвоить, займемся этим:

Set-InboxRule -Mailbox Anderson -Identity "Subject contains ‘Payroll’" -ApplyCategory {Red Category} -MarkImportance 2

Отключение или удаление правил

У нас также есть возможность отключать или удалять правила.  Предположим что наш руководитель опять изменил свое мнение (бывает у них такое, что поделать) и теперь он не хочет что с сообщениями содержащими слово Payroll просходили какие-либо изменения. Мы можем выполнить это просто отключив правило с помощью следующего командлета:

Disable-InboxRule -Mailbox Anderson -Identity "Subject contains ‘Payroll’"

Если вы хотите полностью удалить правило, процесс очень похож, отличает лишь командлет. Используйте:

Remove-Inboxrule –Mailbox <MailboxName> -Identity “<Inbox Rule name>”